MonGone
MonGone Documentation
Warning
⚠️ Warning: The execution phase of MonGone involves operations that may be destructive, especially when deleting clusters. Please ensure you understand the generated plan before proceeding with execution. The report and plan generation phases are safe to use for analysis, but take caution with optimizations and read the documentation thoroughly.
Overview
MonGone is an open-source tool that helps optimize MongoDB Atlas environments by scaling down unused resources, converting fixed resources to auto-scaling, and reducing overall costs. Below is the complete documentation on how to install, configure, and effectively use MonGone to streamline your MongoDB management.
Installation
MonGone can be easily installed using pipx. Follow the steps below:
Installation via pipx
pipx install git+https://github.com/raestrada/MonGone.git@v0.4.2
Alternatively, you can use pip if pipx is not available:
pip install git+https://github.com/raestrada/MonGone.git@v0.4.2
Once installed, you can verify the installation by running:
mongone --help
This command will show the list of available commands and options within MonGone.
Getting Started
To begin using MonGone, follow these steps to initialize the configuration, generate reports, and optimize your MongoDB Atlas environment.
Step 1: Initialize Configuration
Run the following command to create a configuration file (mongone.yaml) with your MongoDB Atlas organization details:
mongone init --atlas-org-id YOUR_ATLAS_ORG_ID --report-period-days 30
atlas-org-id: Your MongoDB Atlas organization ID.report-period-days: The number of days for which databases should be considered unused. Default is 30 days.
This command will create a mongone.yaml file containing configuration information for MonGone.
Step 2: Set Up API Keys
MonGone requires access to the MongoDB Atlas API. Set the following environment variables with your Atlas API keys:
export ATLAS_PUBLIC_KEY=your_public_key
export ATLAS_PRIVATE_KEY=your_private_key
These API keys are required for MonGone to authenticate with MongoDB Atlas and collect data.
Permissions Required:
- Project Read-Only: To read cluster, database, and project details.
- Organization Read-Only: To list all projects and access organizational usage.
Make sure the Atlas API key you create has sufficient permissions to perform read operations.
Step 3: Generate a Report
Once the configuration file is in place, you can generate a report of your MongoDB Atlas resources to determine unused resources and optimize costs.
mongone generate-report --period 30
period: Specifies the number of days for which databases are considered unused. The default is 30 days.
The report is generated in HTML format (report_YYYYMMDD_HHMMSS.html) and will provide detailed insights on your MongoDB Atlas organization.
Step 4: Execute an Optimization Plan
After generating a report, MonGone also allows you to execute an optimization plan to streamline your resource management.
mongone execute
This command will execute the actions defined in the generated optimization plan, such as scaling down unused resources or enabling auto-scaling for clusters. Ensure you review the generated plan carefully before execution, as some actions (like deleting clusters) may have a significant impact.
Understanding mongone.yaml
The mongone.yaml configuration file is created during initialization and stores key information such as:
atlas_org_id: YOUR_ATLAS_ORG_ID
report_period_days: 30
environment_patterns:
  staging: ".*staging.*"
  production: ".*production.*"
Explanation of Fields
atlas_org_id: The MongoDB Atlas organization ID.report_period_days: The number of days to consider resources as unused.environment_patterns: Regular expressions used to determine the environment of the clusters. MonGone uses these patterns to identify and label environments asstagingorproduction.
Default Regular Expressions
- Staging:
.*staging.* - Production:
.*production.*
These patterns can be customized in the configuration file to fit your naming conventions.
Report Contents
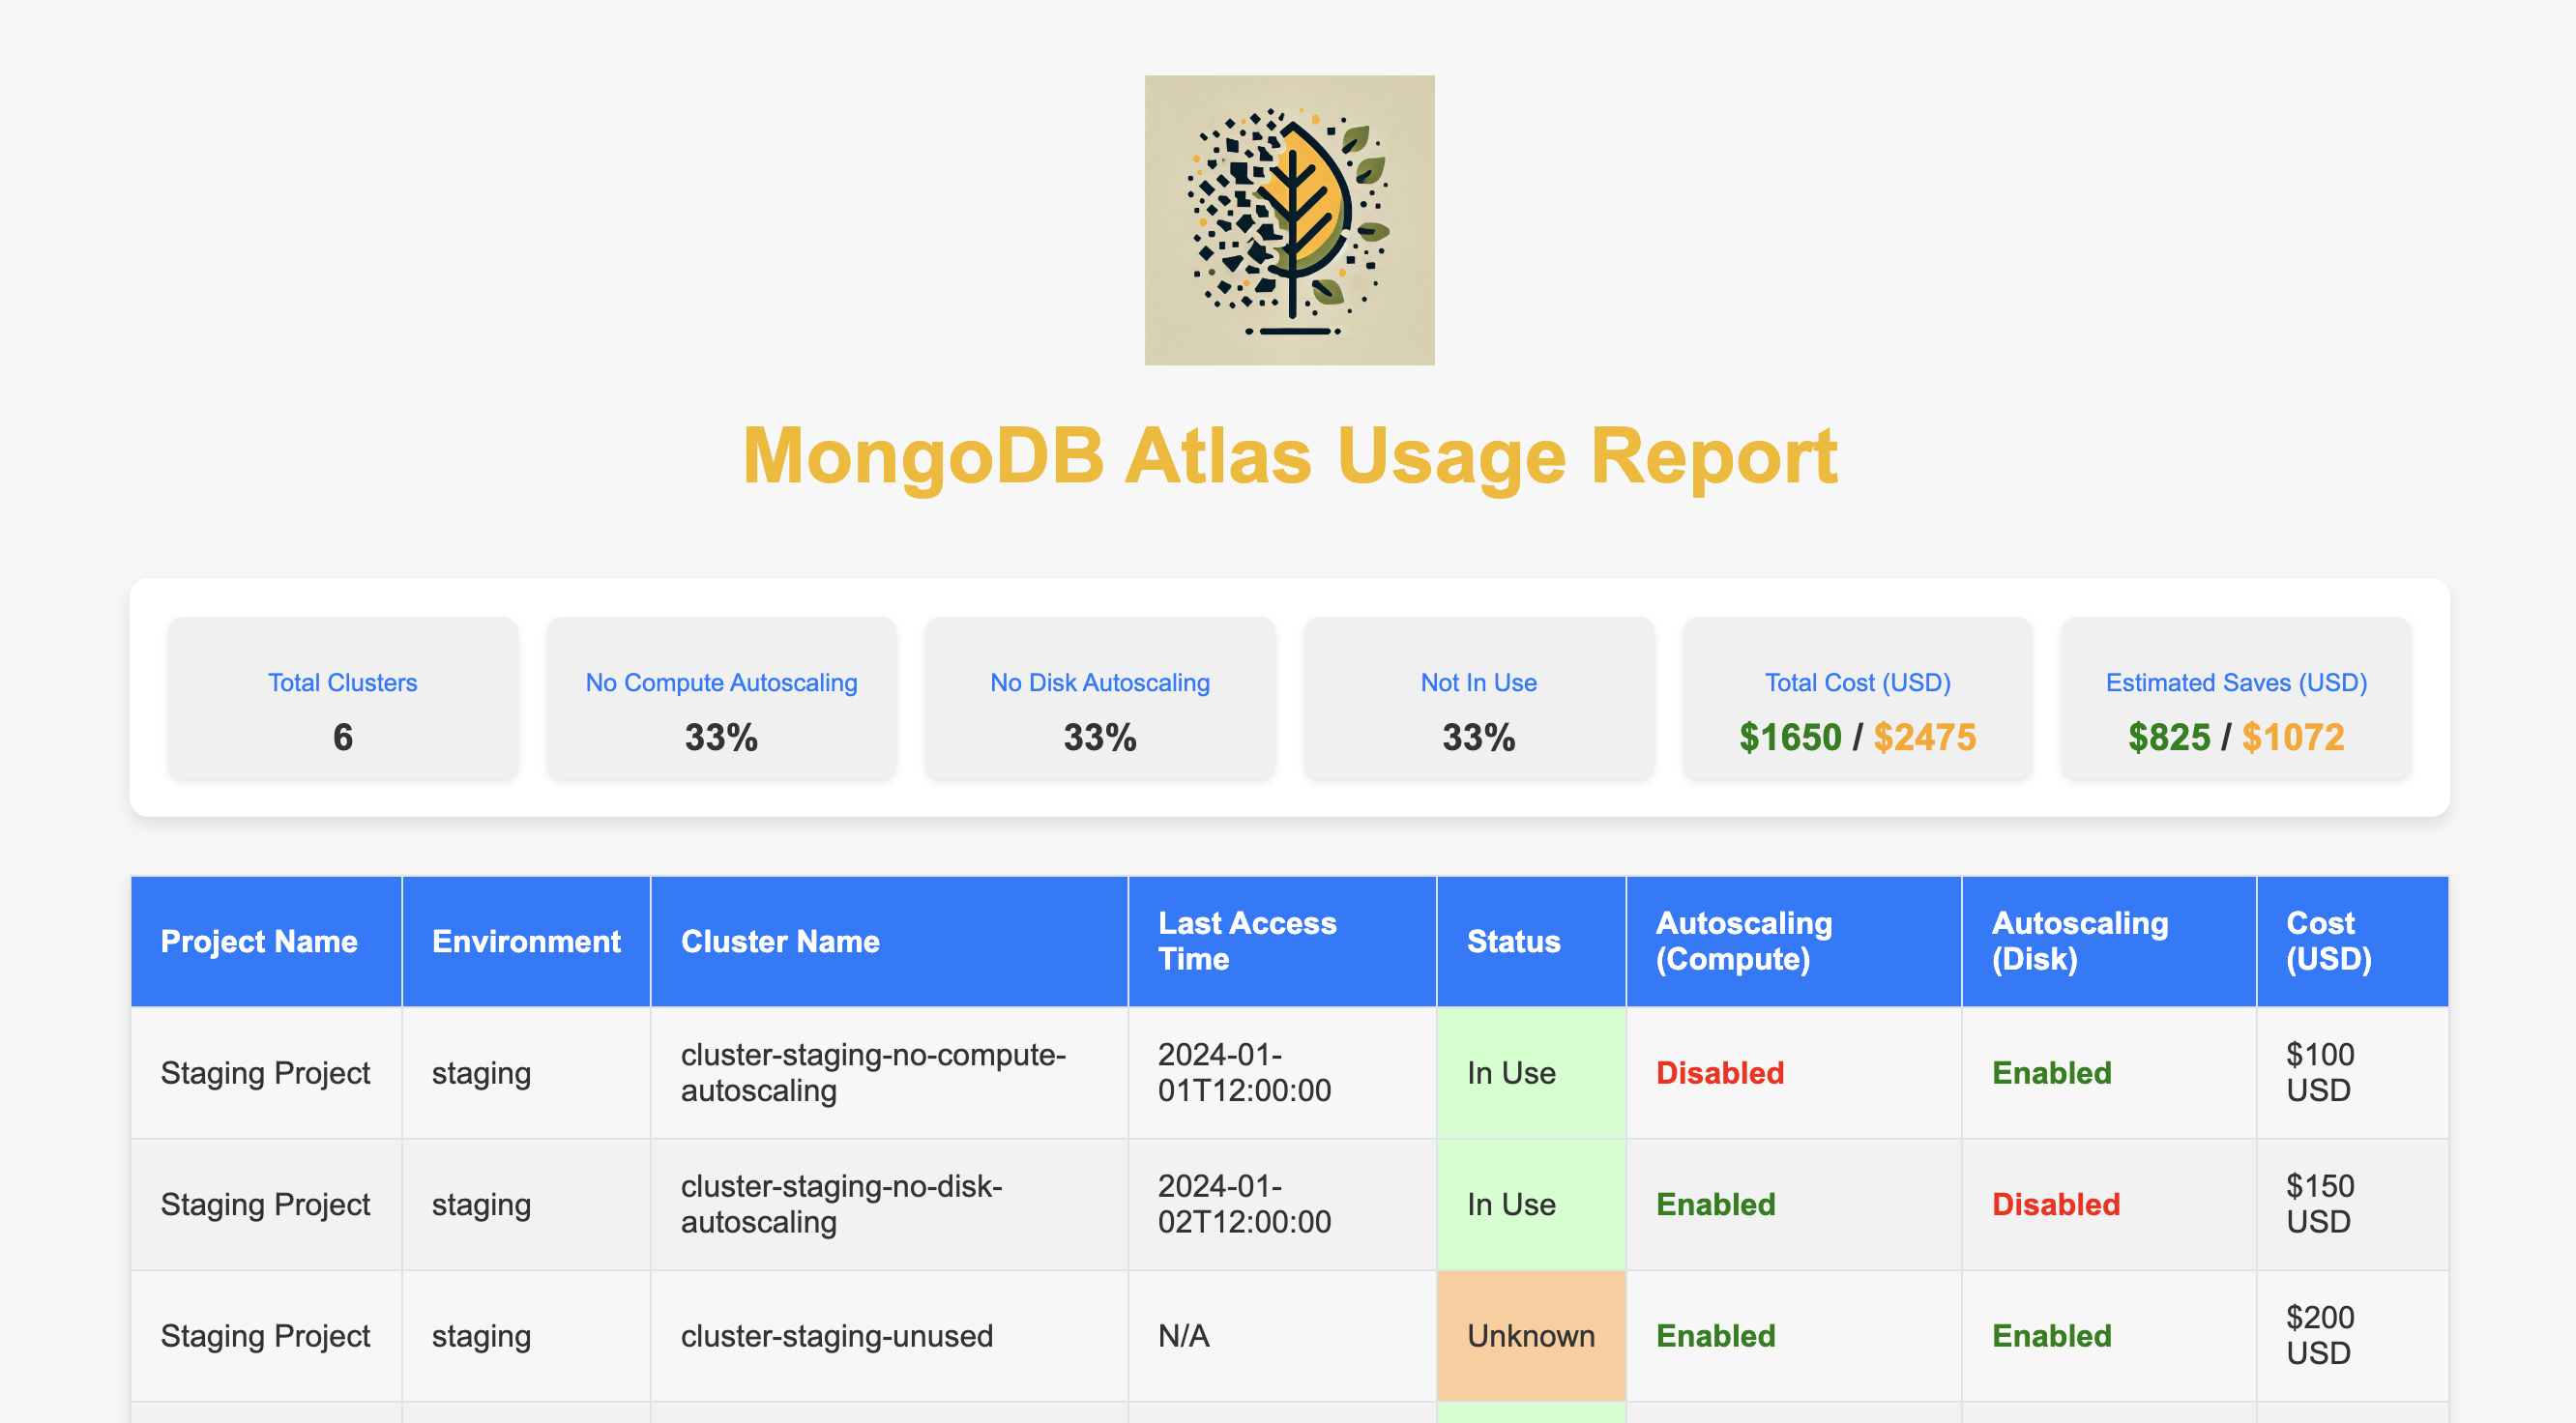
The HTML report (mongone.html) provides a comprehensive view of the MongoDB Atlas organization. It contains the following sections:
- Header: Displays the MonGone logo, an introduction, and a summary of statistics.
- Summary Statistics: Includes the following:
- Total Clusters: The number of clusters.
- Clusters Without Compute Autoscaling: Percentage of clusters without compute autoscaling enabled.
- Clusters Without Disk Autoscaling: Percentage of clusters without disk autoscaling enabled.
- Clusters Not In Use: Percentage of clusters not accessed within the specified period.
- Total Cost (USD): The calculated total cost across all clusters.
- Detailed Cluster Table: Contains the list of clusters grouped by project, showing:
- Project Name: The name of the project.
- Environment: Environment type (e.g., production, staging).
- Cluster Name: The name of the cluster.
- Last Access Time: Timestamp of the most recent access.
- Status: Whether the cluster is in use or unused.
- Autoscaling (Compute/Disk): Status of autoscaling for compute and disk.
- Cost (USD): Cost of the cluster.
Summary Bar
The summary section is displayed above the table, showing statistics such as total clusters, percentages of unused clusters, and cost breakdowns in a simplified and visually appealing format.
Environment Variables
MonGone requires certain environment variables for authentication and configuration:
ATLAS_PUBLIC_KEY: MongoDB Atlas public key.ATLAS_PRIVATE_KEY: MongoDB Atlas private key.
Set these variables to ensure MonGone can authenticate with MongoDB Atlas.
Usage Details
Below are some of the essential commands for MonGone:
mongone init
Initializes the mongone.yaml configuration file. Required options include:
--atlas-org-id: Your MongoDB Atlas organization ID.--report-period-days: Number of days to consider a resource as unused.
mongone generate-report
Generates an HTML report for MongoDB Atlas resources.
--period: Defines the time window to consider resources as unused. Default is 30 days.--force: Forces the generation of a new report, ignoring existing data.--test: Usestest-data.yamlinstead of fetching data from MongoDB Atlas, useful for testing.
mongone execute
Executes the generated optimization plan, scaling down unused resources and enabling auto-scaling for clusters as needed. Make sure to carefully review the plan before execution.
Best Practices
- Periodic Analysis: Run the
generate-reportcommand periodically to keep track of unused resources. - Review and Adjust Environment Patterns: Update the
environment_patternsinmongone.yamlto match your naming standards. - Review Permissions: Ensure your MongoDB Atlas API key has the correct permissions to avoid authorization errors during the report generation.
FAQ
Why are my clusters not being detected as unused?
Make sure that the value of report_period_days matches your expectations for identifying unused resources. Additionally, verify that the MongoDB Atlas API keys have sufficient permissions.
How can I customize the environment patterns?
You can modify the environment_patterns in mongone.yaml to use any custom regex that matches your project naming conventions.
License
MonGone is released under the MIT License.
For any questions or contributions, visit the MonGone GitHub repository.
Visit the MonGone Home Page for more details and the latest updates.